I know I know.. This post is nothing near Power Platform or Dynamics, but it’s just a friendly reminder that you need to check you backup of the Azure Authenticator App on your phone.
I don’t really feel the need to explain what the app is, because I expect everyone reading my blog to be aware of the application on some shape or form (private and business). As a consultant your application might look something like mine (pages and pages of entries):
This is literally pages and pages of logins for customers that have 2 factor authentication setup. Loosing access to this will be a serious pain in the A**!! Well, that is exactly what happened the other day without me having any idea why. 🤬🤬🤬
Of course I headed on over to my backup just to see that THE BACKUP WAS NOT THERE!!
Well, the backup was there, but it was a stale backup from 1 year ago. For some reason the application had stopped doing the auto backups. 🤦♂️🤦♂️
What todo?
Just make sure backup is turned ON, AND make sure that it is backing up automatically 😂 1. Open Settings 2. Turn on 3. If already on, click Details to look at the latest date for backup.
Something small, but yet useful. Thank you Tanguy for the tip🤗
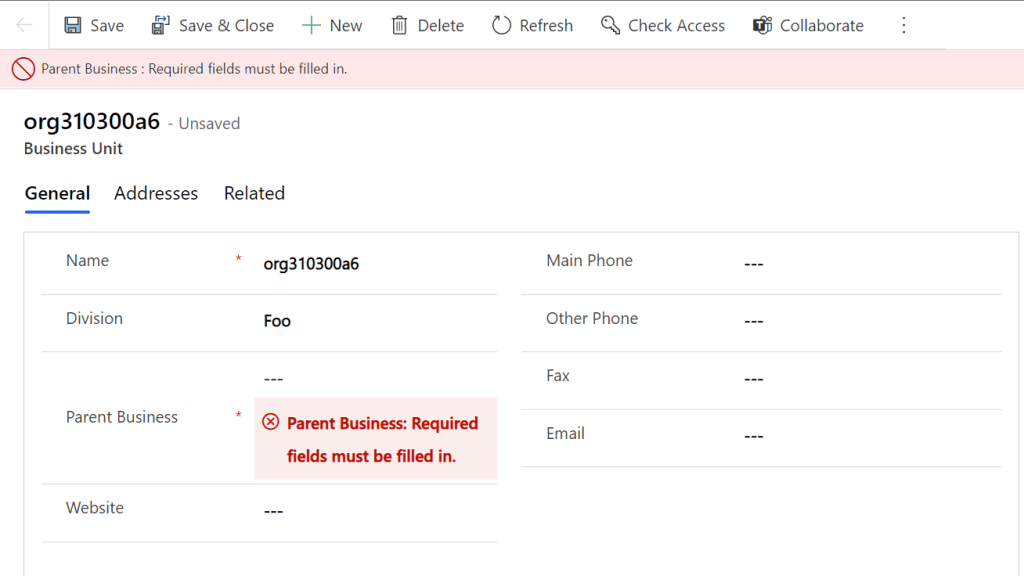
As you probably figured out the Default Business unit name is something you can’t change OOTB after you have created a CRM/Dataverse environment.
If you are not careful when creating a new environment the org name will be set for you, and that is also when the Business Unit Name is set.
This can result in the following main Business Unit, and it just doesn’t make any sense. Also you can’t change it because Parent Business needs to be entered. Problem is that there is no parent to the parent in this case 🤣
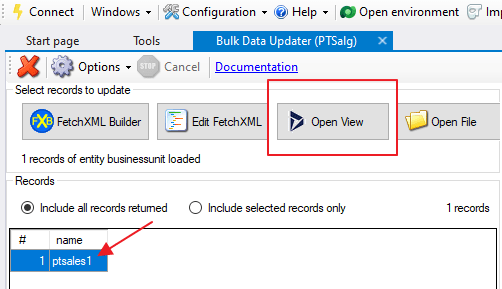
XrmToolBox – Bulk Data Update to the rescue😎
Open the view for active Business Units and find your result.
⛔NB!!Make sure your search only returns one business unit⛔
Next thing you do is set a fixed value, add attribute to the bulk job, and the update the record.
When Microsoft introduced Azure for the Microsoft public, it was a new way of thinking. We were suddenly paying for what we needed and when we needed it. Amazon had been there for a long while, but for Microsoft customers this was a new way of thinking. After a skeptical start, this model has really become somewhat of a system standard.
As of today Power Platform will be available on Azure subscription! It is being introduced as a “Pay as you go” model. It is important that you don’t mistake this for the same as Azure. In Azure you actually only pay for the compute time used (in most cases), but here you will pay for a license once you use an application.
WOW THIS IS SOOOO COOL … Well, is it really?
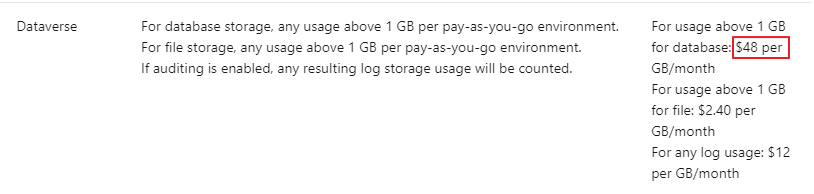
Let’s just think about the following first. Just a few weeks ago Microsoft dropped the prices to half of what they used to cost. They are now only 5$ and 20$ for the different plans. When you think about the value you get from a Dataverse OOTB that is a BARGAIN already.
So why am I not overly excited about the “Pay as you Go” PAYGO model? Well, I don’t really see the big impact yet. Most of my customers are on the CSP agreement, and can flex as much as they feel for. Planning ahead for apps is also hard, and is counter intuitive for innovation. By releasing a plan as PAYGO, you essentially need to plan financially for all users that might use an app, while you silently hope that not all users actually use the app that month. For every user that didn’t use the app, you save some money.
I am sure that the plan makes sense for many scenarios, but I just don’t really see them yet. The good thing is that “limitations/possibilities” for the new plan will be monitored closely in the beginning to find the correct levels for all types of use cases. Remember to voice your opinion if you see some great opportunity. Microsoft will be listening😀
The only thing that we know for sure is that licensing will always be a situation where we as consumers want changes. We want more more more, and want to pay less less less. Microsoft will continuously find new license models to adapt to our wishes while finding ways to keep profits. Don’t get me wrong. I am all about Microsoft being able to charge what they want. After all it’s a great product!!! I’m just saying that you need to look behind the shining stuff before you automatically assume that everything new is automatically better.
What you need to do as a customer is get help to assess assess your licensing situation. Not only is licensing complex from a rules perspective, but the applications can be modified to adapt to licensing changes. I am not saying PAYGO is bad, but I’m not jumping on the PAYGO train quite yet. Most of my customers are CSP customers and have a lot of freedom with licensing (Up and Down). Just going to see what happens first 😁
I might also have misunderstood quite a lot in regards to the benefits received from this model, and if so I would love feedback to learn new ways of thinking!👌
In my last post I wrote about Adaptive Cards in Teams, but a vital factor for that adaptive card to be interesting is the content on the card. Dynamics 365 Sales Adaptive Card🚀.
One of the technical bits last time was connecting with an HTTP GET request to the API. I will be using the same information to create a custom connector so that anyone can reuse for the future 😁
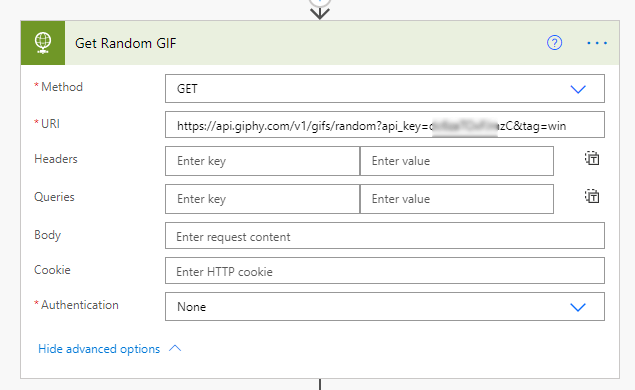
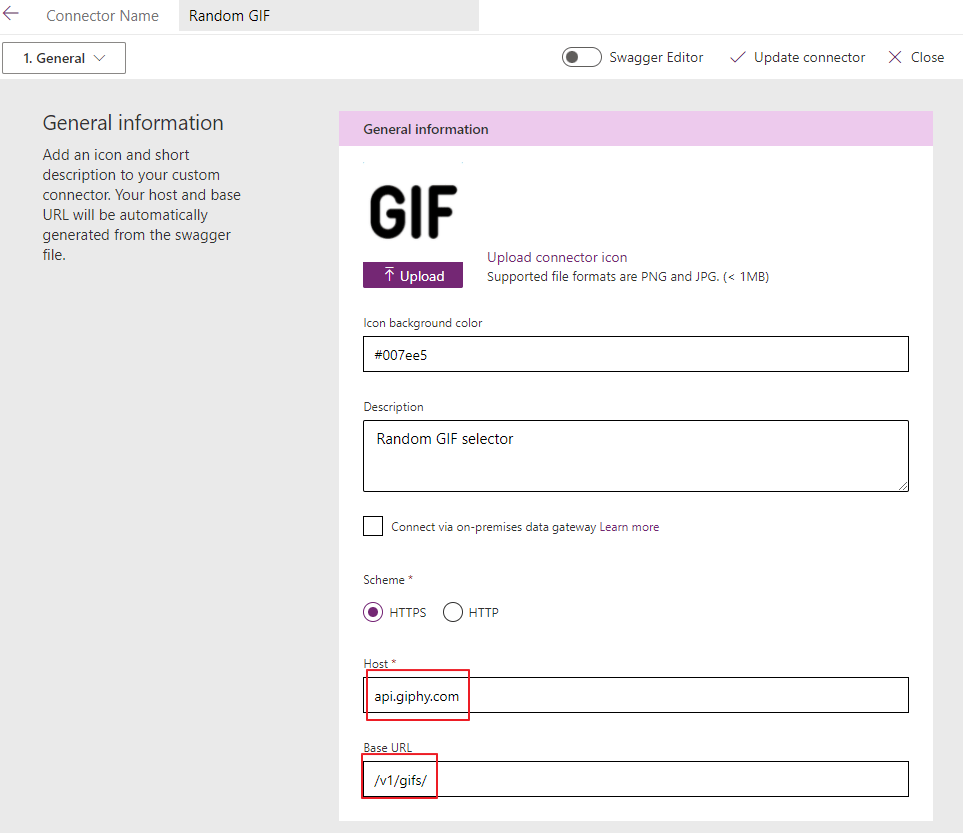
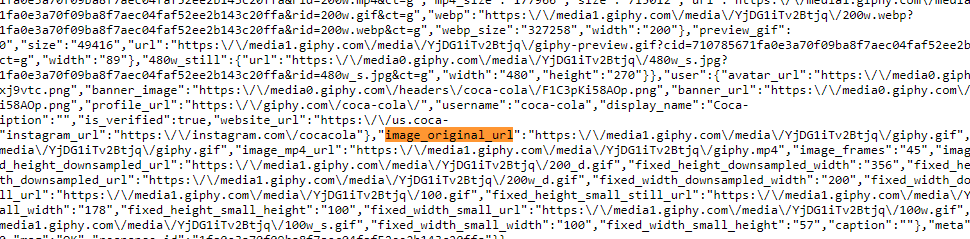
Step 2.. Break down the URL from the first picture like this
Step three… If you don’t really know how to do this, ask a friend!! 🙂
Step three again.. Enter the security settings. When entering the security settings and providing something more than blank, you will be prompted with the credentials first time you create a connection to the connector.
I broke the URL down further with the “api_key” as a query, so that it would show in the URL like the example on the first picture.
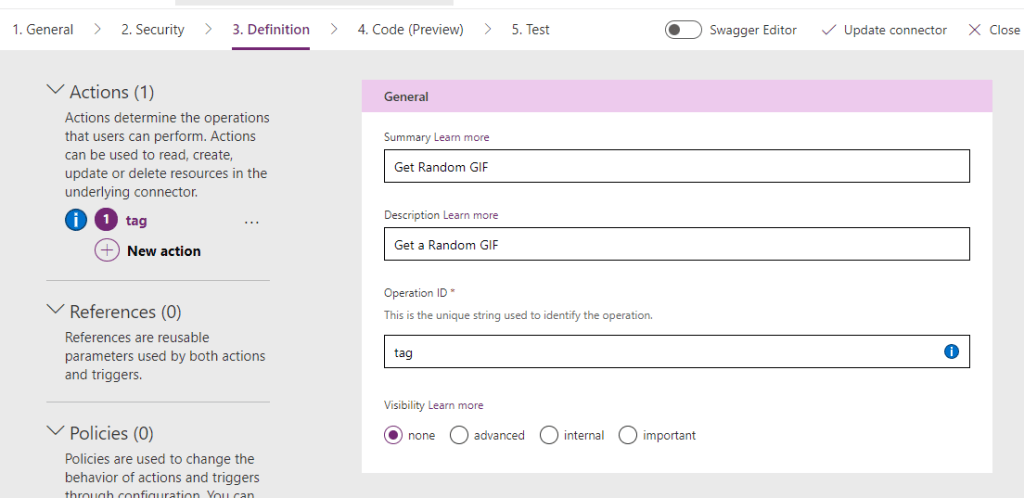
Step four.. Create a search tag like the one I had in the URL from the first picture
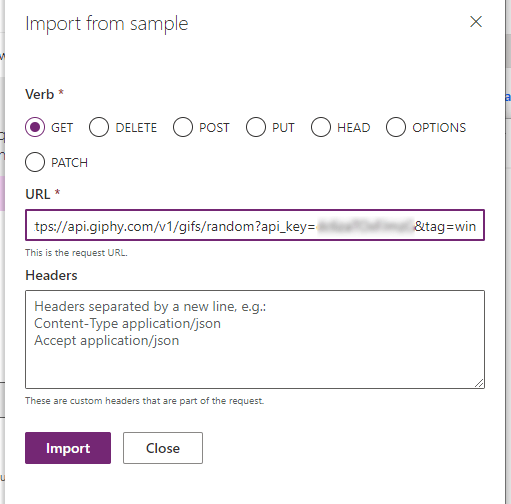
Step five.. Get the URL from the first picture with your API key, and add this to the import sample
Choose the GET in this case, and add the full URL
Your request should look something like this:
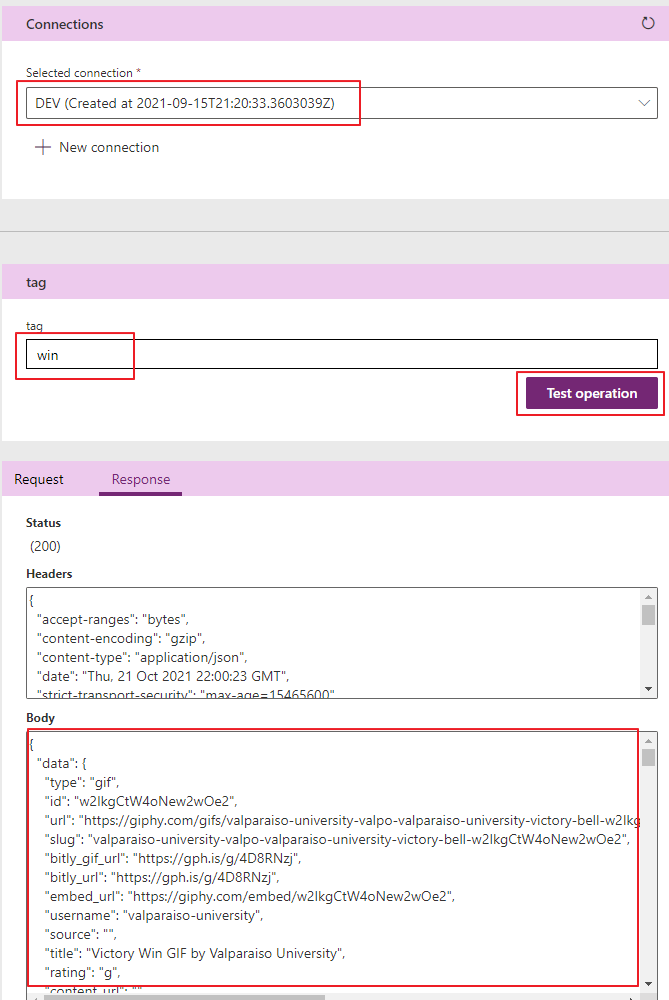
Step 6.. Add a connection to the connector and test with a tag. It should return some info like this:
Result
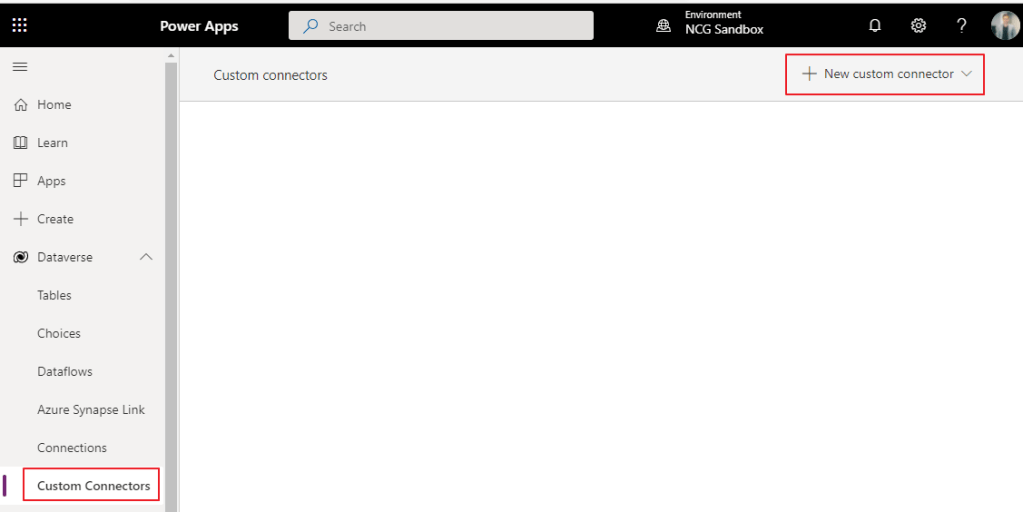
When you are done, you have a custom connector you can reuse from Power Apps, Flow or any other tool that can use custom connectors.
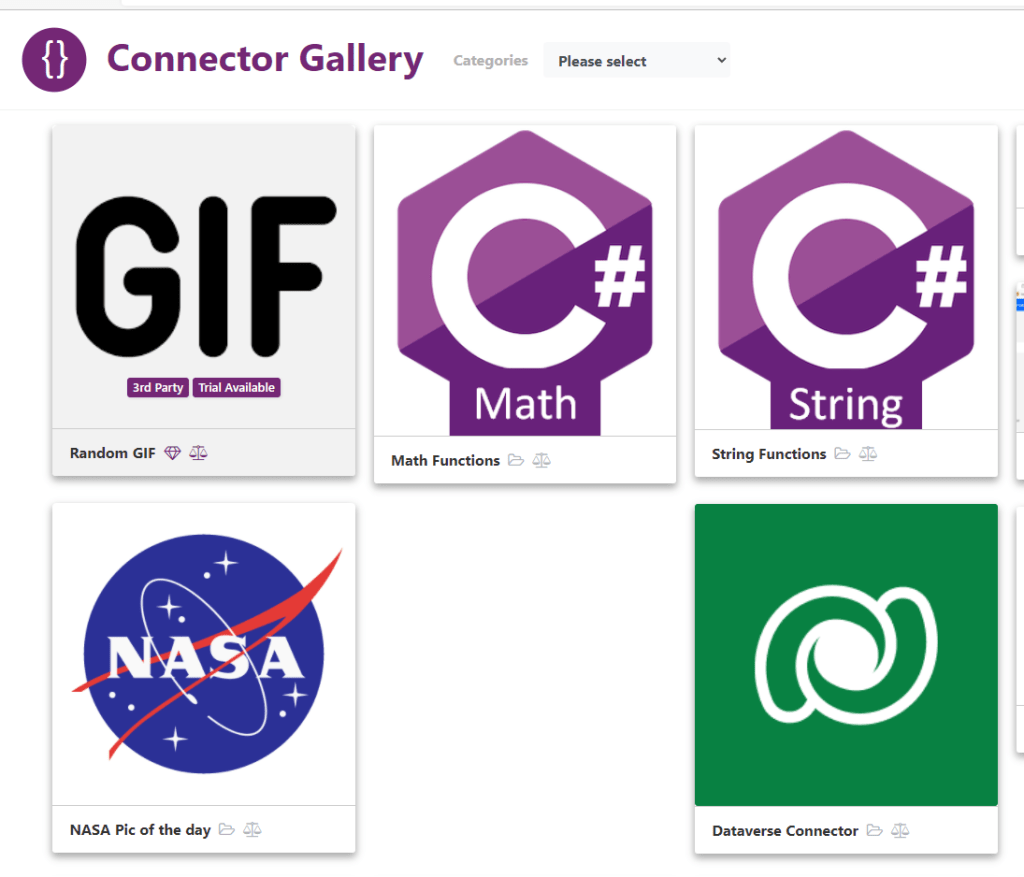
Connector Gallery 🌌
What better thing to do than release this to the https://connector.gallery when you are done creating a new connector?? :😁💪🥇
Doesn’t matter how many times you tell a salesperson that input of data is important. They will always ask you what’s the output that I can look forward to. A few years back I remember gamification being important, but you normally need high volume of sales + many sales reps for it to be any fun. So in the constant pursuit of having some fun with sales I managed to find a new way of spreading some joy 😉
Adaptive cards?
If you are not familiar with Adaptive Cards, you are not alone. Adaptive Cards are configurable messages that can be delivered either within a chat or channel (plus many other services). The card is basically just a “custom page” that you create and send to the chat in Teams.
Image from Microsoft Docs
Adaptive Card Configuration
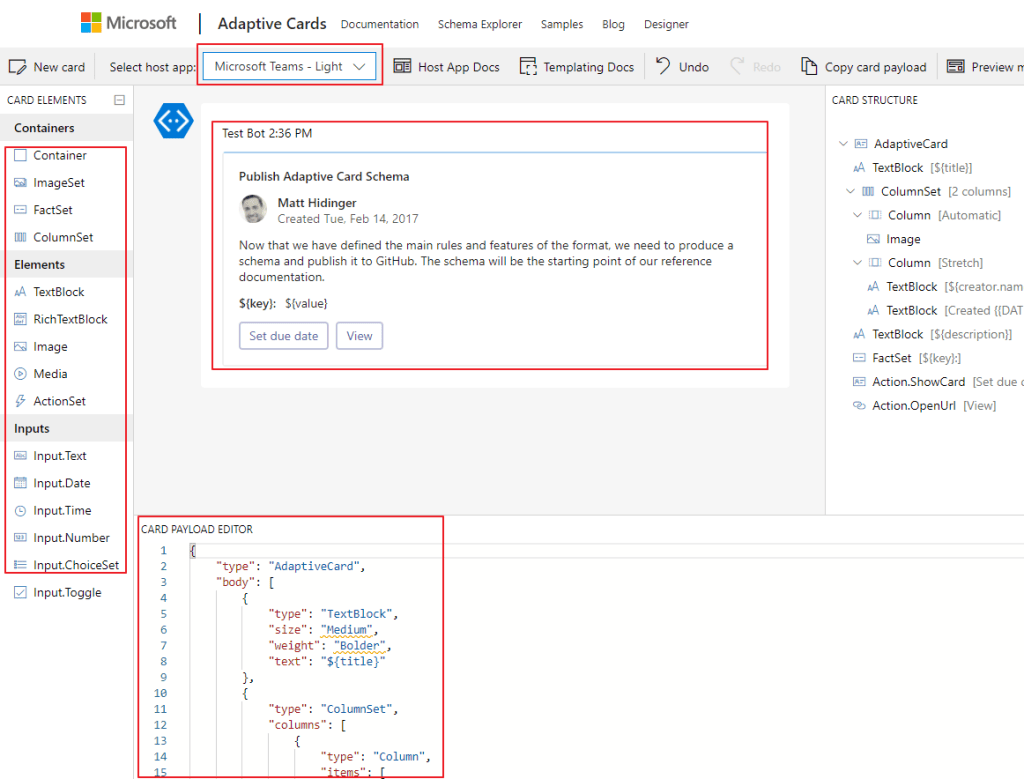
Learning how to create adaptive cards isn’t all that hard. Head on over to https://adaptivecards.io/designer/ and begin designing your personal adaptive card. Because we are working with Teams, we choose the following.
Start by choosing the Microsoft Teams – Light or dark. Other configurations might not work.
Middle part is your actual card.
Left side are the components you can drag/drop to the center card.
Down low is the JSON we are going to copy paste once we are done with the visuals
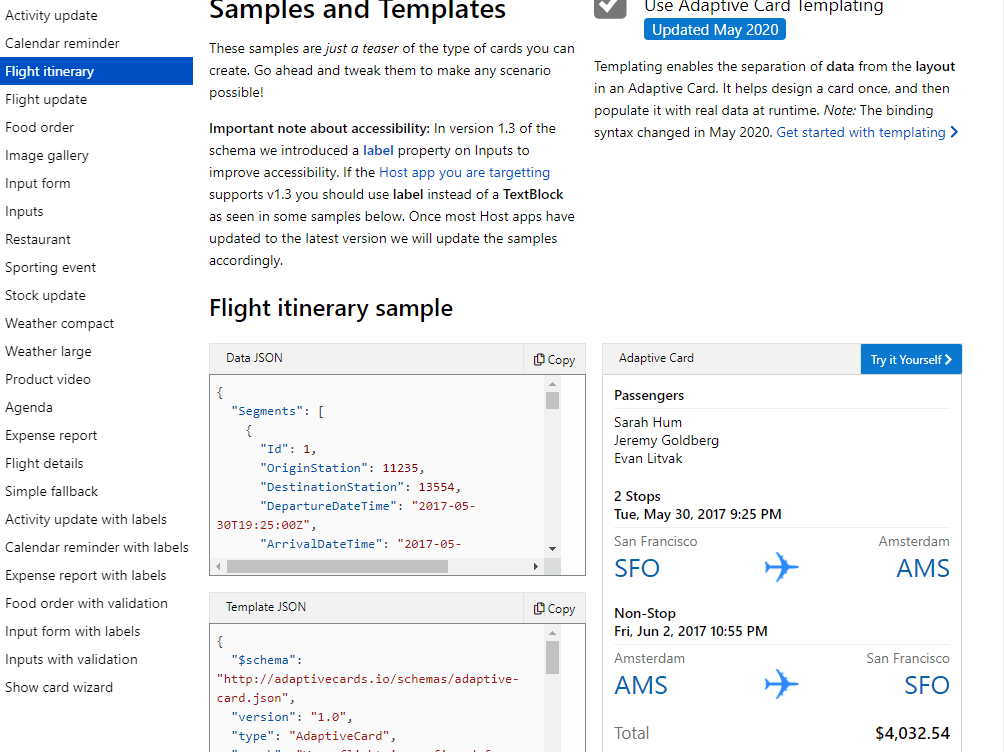
Adaptive Card Samples
If you are as terrible as I am being creative, you can find tons of samples here.
Gif’s ‘R’ us 🙌
For the next step we want to get a random GIF from a GIF site. I have found an API for Giphy that seems to be working great.
Head on over to Gyphy API and create a new account. Then open a new app to attain an API key
Power Automate
Create a Team for the sales users, or just use the one you already have. Once you have found the right place for the adaptive card we can start the next process.
Open Power Automate and setup a flow to trigger once the Opportunity Closes as Won.
The first steps are pretty basic. When Oppty closed as won get the following pieces of data. These are standard Get Item by ID, so no need to dive into details here.
This will send a request to Giphy asking for a random GIF with the WIN tag.
Opening the URL in the web browser you will receive a LONG json back. The only text we need is the
Therefore we have to parse the Json to get the URL of the Original Image. If you don’t know how to do this, look for Power Automate Parse Json. Basically just copy the text above from the web browser, and open it in the “Generate from sample” part. This will automatically create the following Json Payload.
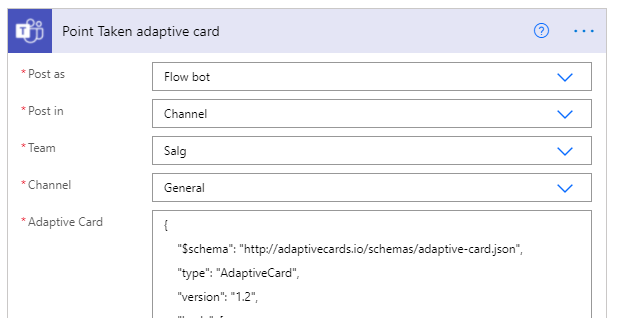
Last step to the process is adding the Adaptive Card to the Flow
The text in the adaptive card is what I copied from the adaptive card configurator on top 🔝
I could add the complete Json here, but all you need is your personal adaptive card inserted to this step.
Result – CHECK OUT THIS BAD BOY😎
It’s just a simple message in a chat, but this stuff really get the sales team going.. Now it’s a competition getting the funnies GIF, and most likes:) It’s not really gamification, but it sure is a lot of fun🎉😁🎈
Tiny blog for a tiny button 😂 This is only relevant if you have users that work in Outlook Web. Every now and then I do encounter a few Apple users that prefer the Outlook Web, even though it works well with Outlook for Mac.
Outlook client
If you use the Outlook client you know the button from the ribbon. Click the button do load the client.
Outlook Web.
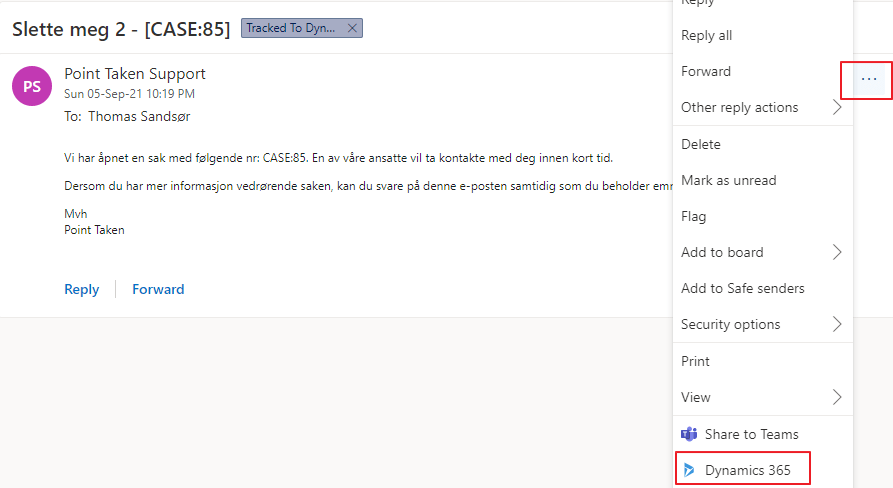
OOTB the Dynamics client is hidden once it is deployed for the user. Only way to find it is to open the actual email and choose the ellipsis
Great thing is that we can change the order of the buttons:)
Solution
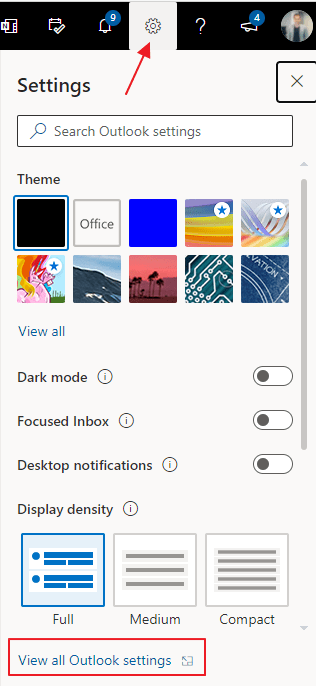
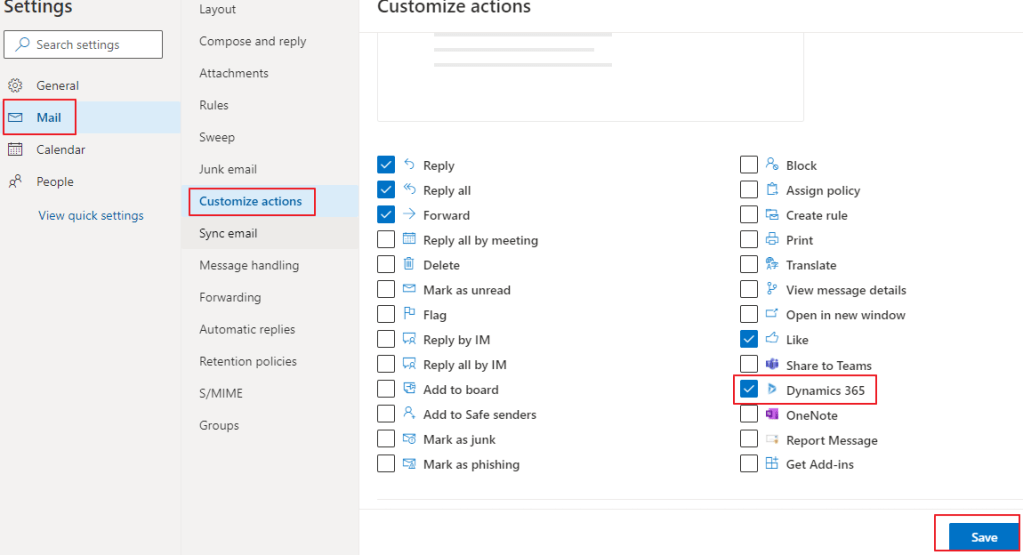
Open the Outlook Web settings and choose “View All Outlook Settings”.
Find the Dynamics 365 button in the Customize Actions and click save.
If you are using email to case, SLA or any Automatic Record Creation in classic you really need to update your rules ASAP to the new UI.
I can’t seem to find the message in the make.powerapps.com, but it’s one of the first messages that appears when opening the classic editor in solutions.
This post is not going to comment the pros/cons of the old vs the new. I will have to come back to you on that one. I am simply stating that you have to do this because it’s not only being deprecated, but it is being shut down. Microsoft has actually created a migration path for the rules, and documented the process fairly well.
I use these rules for the most in the email to case scenario. First it has some conditions, and then it has the actual create of the case record.
When running through the migration, it does in fact get the conditions correct when migrating, but not the owner that I have in the create statement later. This has to be manually added to the flow created by MS.
Post Migration
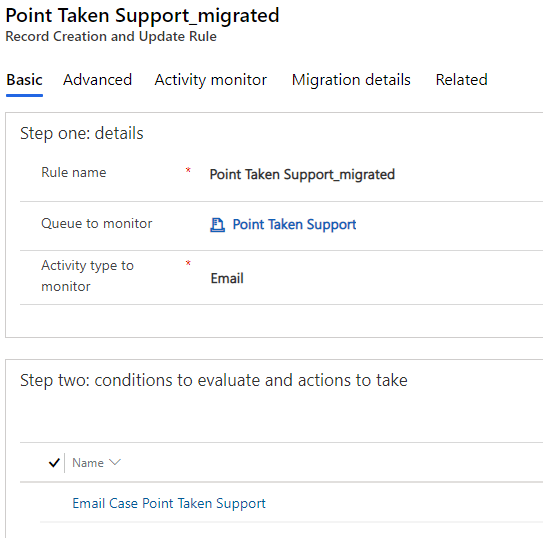
After the migration is done, I had the following:
A record rule in the new UI
The conditions also got migrated without issues
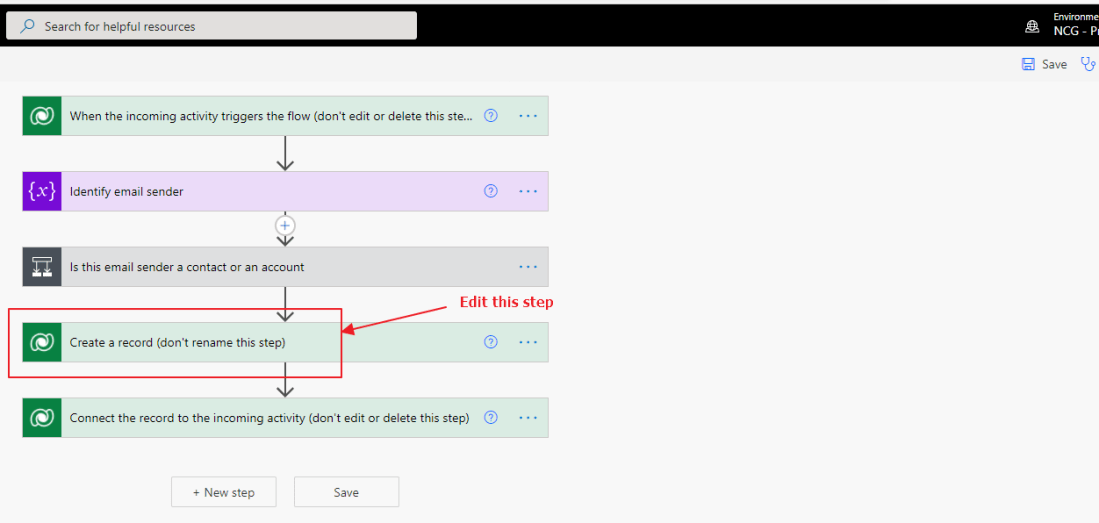
And a new flow that Microsoft Autocreates for the email to case record creation. The red box marks where I had to add the “owner” field for the Teams ownership that I normally use.
All of these steps are automatically added by Microsoft. This is also the case if you do a NEW Email to Case from the UI. It feels a bit odd to put my faith in the hands of something automatically created, but for now I have to go with the flow.
NB!!! REMEMBER TO CLICK THE SAVE BUTTON IN FLOW BEFORE ACTIVATING THE RULE
So far it seems to be working OK, but I have to do some more heavy testing before I can conclude that the Flow is as stable as the old rules within Dynamics. We are running it in production, so I will update if I see any problems 🤞
Earlier I wrote about connecting SSIS to Dataverse for Teams. At the time of writing the article it was not possible to connect to DV4T via KingsWaySoft and SSIS.
I wrote about the theme because I still think it is highly important to merge some data to DV4T in some business scenarios from a Dataverse table. DV4T is essentially built for quick and agile projects, but these projects could need a little data from time to time to hit the ground running. Exporting / Importing data via Power Automate is in my book not a very solid option, and feels like a “work arround”.
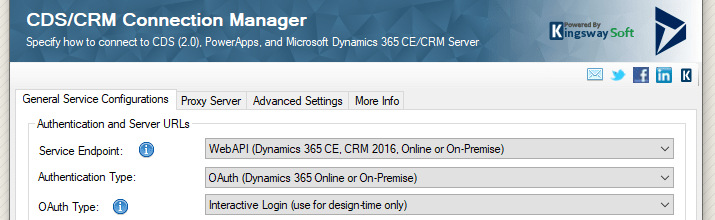
In the recent update of KingsWaySoft they just released an Interactive Login Experience
Normally the best practice for SSIS and KingsWaySoft would be with an Application User. The only problem is that Dataverse for Teams doesn’t support application users. With the new type of connection the you have to manually add the username/password for each run. It retrieved a new token for each run.
How to set it up
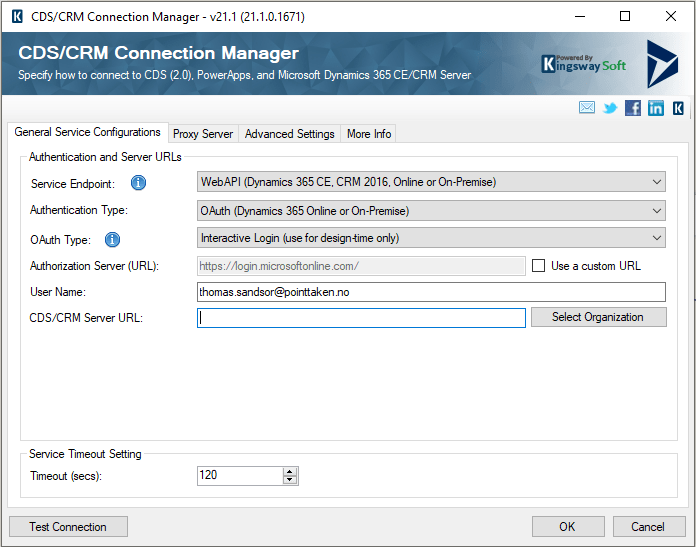
Open your preferred SSIS tool and start a new connection manager. Notice that I have chosen the Interactive Login for OAuth Type.
Add the username and open “Select Organization”
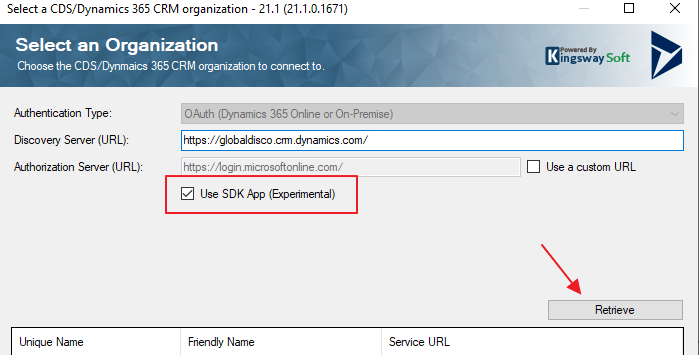
I am not completely sure what the “Use SDK App” is for, but we have 2 factor authentication, and I had to activate this option for it to bypass the need for App ID.
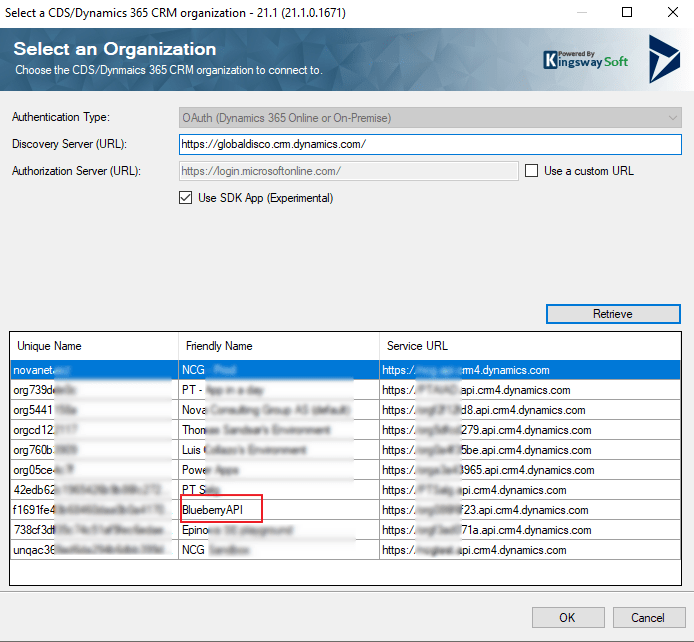
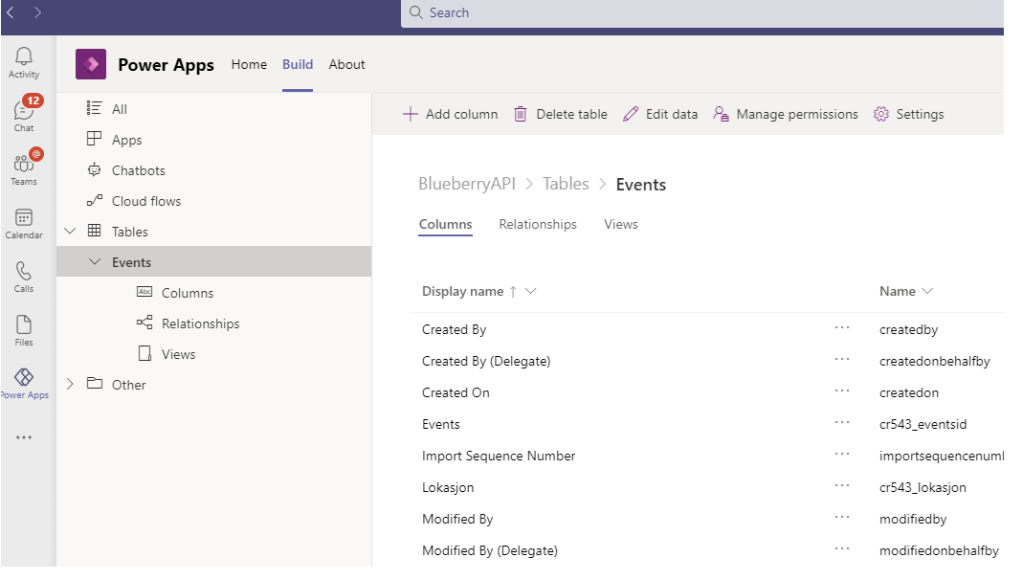
Click on Retrieve and now we can see all organizations. Dataverse AND DV4T. The BlueberryAPI is a Dataverse for Teams database.
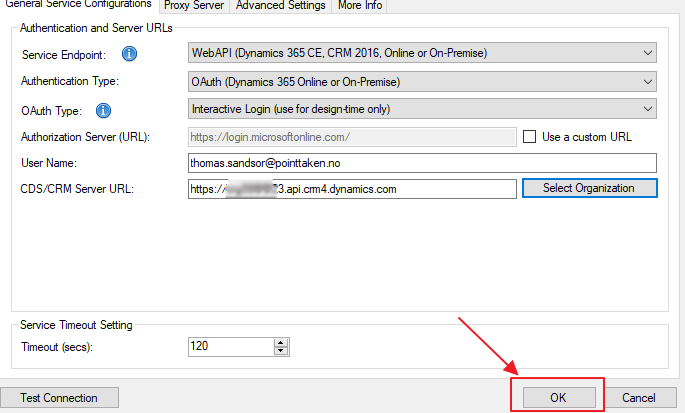
WAIT BEFORE YOU TEST CONNECTION!Click on OK
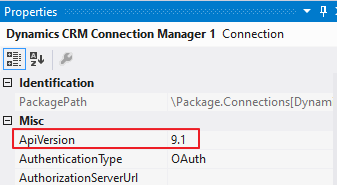
Right click on the connector and open properties
On the right side make sure you add the API 9.1
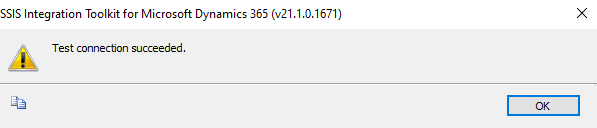
NOW you can test the connection 🤗
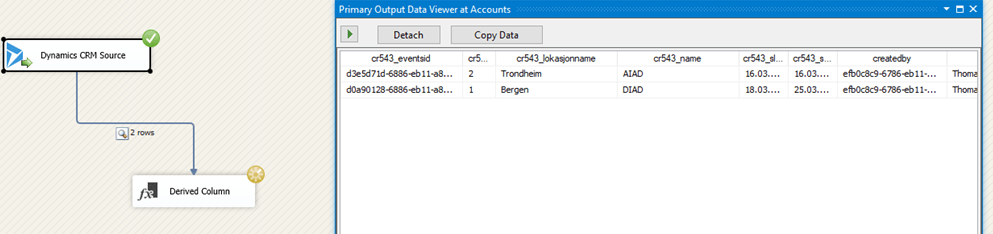
The results
This is what Dataverse for Teams looks like. 1 table called events.
By now I hope most people know the https://pcf.gallery (run by Guido Preite). A great page for sharing community components (PCF) and exposing awesome contributions to the rest of the world. 🌎
What I like about the PCF Gallery is the simplicity of the site only being about PCF components. This is why I asked Guido if we could create a similar site for other components regarding the Power Platform. He was so kind to share his code for the project, so Matt Beard and I decided to give it a go. 🤗
Connector Gallery
First out in list of future galleries is the CONNECTOR gallery . This site will contain all sorts of custom connectors for Power Platform that you can share with the community. If you want to contribute to this gallery, you only have to share the custom connector file you have on GitHub, and we will post it out!
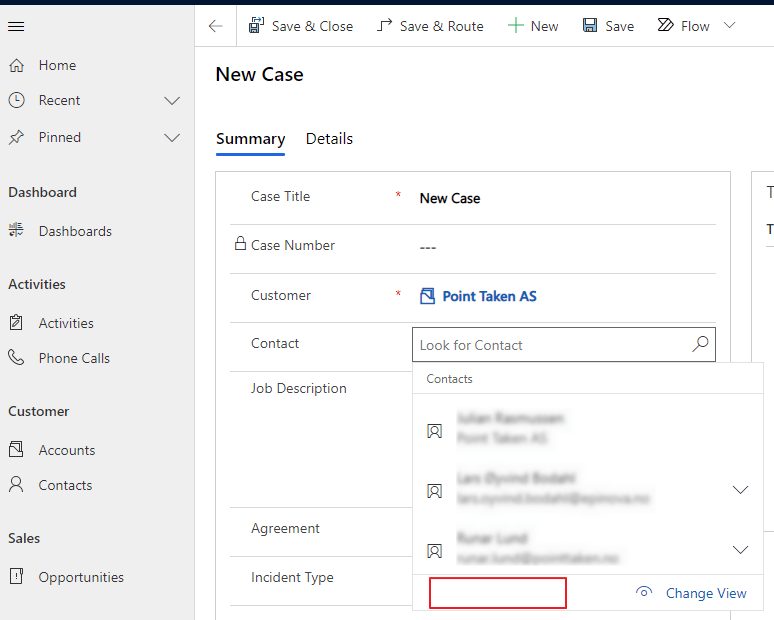
Recently I had this happen twice without really knowing why. The add new contact button was missing on the case form. In the old UI it was present, but in the new UI it was gone.
Problem
Luckily support found out that this is caused by the contact field containing some old “metadata”. All you have to do is remove it and add it back.
FIX
As you see here we have added the same field twice.. Now you can remove the “OLD” contact field and then publish..
Voila!
A pretty random thing to happen, but an easy fix:)