Timeline Old vs New

In Norway we have a saying “everything was better before”. It’s commonly used to describe what old people feel when things are just moving to fast, and they don’t see the purpose of the change.

The new timeline for Unified Interface has been like this for me, BUT recently things are starting to get better:)

The Old

2 tasks and 2 phone calls created. Et was easy to see what type of records these were on the left side with the icon. It was also easy to see that they were not yet completed on the right side, AND that they were white.

When completing one of each I saw clearly that it was completed both with color, and the fact that the complete button was gone.

Another great feature about this was the possability to navigate (hyperlink) to the item by clicking on the phone call or task icon. Worked like a charm.

At last you had a nice feature for quick create that was really nice. The only problem though is that this was never a form we could edit, so in the big picture of things I understand why this was not continued.

The new

So the new timeline has been through a few changes, and this is the lates on wave 2 at the time of writing. They have allready made some small improvements that make it better, but lets break it down.

I have the same 2 tasks and phone call. On the left side I now see orange with my name. I don’t know why my name is there. Would make more sense to have the ICON of the activity type. My name should be sown in FULL as is. In a large company you have no idea who TS is.

On the right side it looks like the task is done.. Well, it isn’t.

When you hover over a task you see the color difference, and this is the first time you actually see the button for complete and open. The “check” mark is complete task, but the odd one here is the open record next to the trash can. Why is it so hard to open a record suddenly? This is absolutely not intuitive, but I guess they just need feeback on this.

WTF!

The picture below look like the one above, right? Well, in this picture I have actually completed the to phone calls. Can you tell? Nope.. A little odd to leave out the color coding for the visuals. This should be something they could fix in a small release soon i guess.

So for the new UI we have to rely on the Quick Create form instead of the nice little form on the old one. This is actually not that bad once you get used to it. On this form we have access to the fields via javascript etc, so this is not a bad thing.

Conclusion

I love the new UI because of more activities shown in less space, but they still need to understand how people use the timeline. If you really want to make sense of the timeline you need to clearly see what is todo, overdue and complete. Otherwise it doesn’t make any sense really.

PS!

Will they ever give us the option to stop the email warnings? (i mean completely gone)

Probably not 🙂

Interview – Julian Sharp

Julian Sharp was recently in Norway to teach the App in A Day. I was one of the lucky few that got a spot in his class. Sure I have been in Dynamics since 2007 and should know it all, but that is the only once certainty. I will never know it all, and there is always something to learn from a person that has a different perspective on things.

Thank you Julian for the great class, and the advice during the interview! See you again soon in Oslo for the PowerSaturday August 24th.

Follow Julian in the following channels
Blog
Twitter

Dynamics 365 – Teams. Love at first SITE (pun intended)..

The Team

Hi everyone, meet Knut and Kjetil.

Knut is a salesperson at Point Taken. He just came across a HUGE deal that he has registered in Dynamics 365. This deal is so big that Knut will need the assistance of several resources to deliver. One of these resources is Kjetil, a SharePoint consultant.

The setup

Knut enters the details needed for the Dynamics 365 deal

Knowing that this opportunity is HUGE, Knut starts by creating a new channel in the Offers Team (name is “General” for demo purposes).

The connection

Knut has now setup the structure for collaboration, and is ready to connect Teams and Dynamics 365 together.
Well done KNUT!! 🙂

Add the Dynamics 365 connection for the tab in the channel

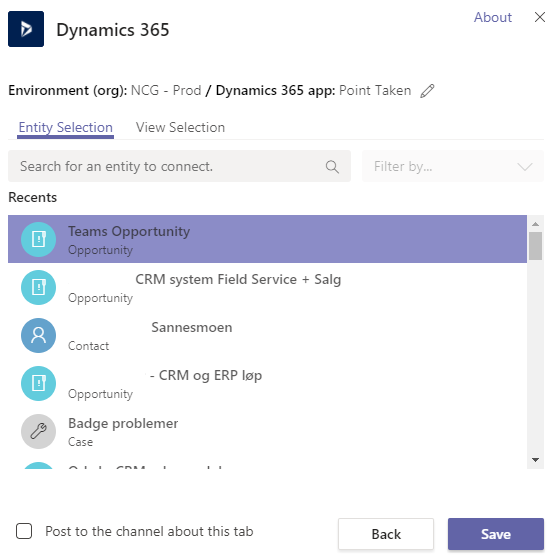
Knut chooses the correct opportunity record.

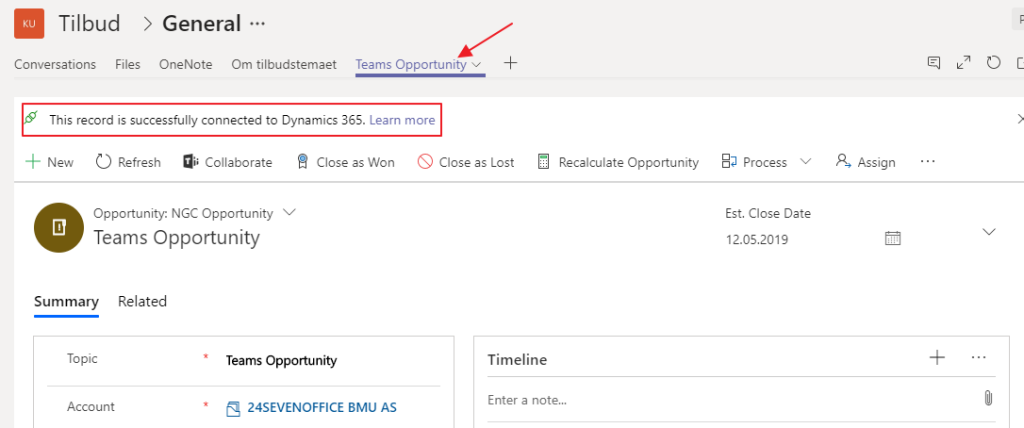
When Knut is done, he can see the newly created connection message in Teams. The above message indicates that Teams and Dynamics successfully connected.

The harmony begins

Kjetil begins right away with the PowerPoint they will need to win this deal. Kjetil does not have a license for Dynamics, so he creates the PowerPoint in Teams because this is the natural place for collaboration.

Knut can now choose to navigate Teams or Dynamcis 365, because the systems are working with the same document location.

Knut and Kjetil represent 2 different work processes, but are harmonizing well when referring to the ONE TRUTH document. Well done you to!!!

Dynamics and Teams in perfect harmony!

Dynamics 365 – Teams Configuration

The configuration of the client is pretty straight forward. A typical office product, and that is a good thing:) FYI, it does not install a solution file within Dynamics, and I like that a lot… Never been a fan of the overcrowding of solution files (Hint hint portals.. hehe).

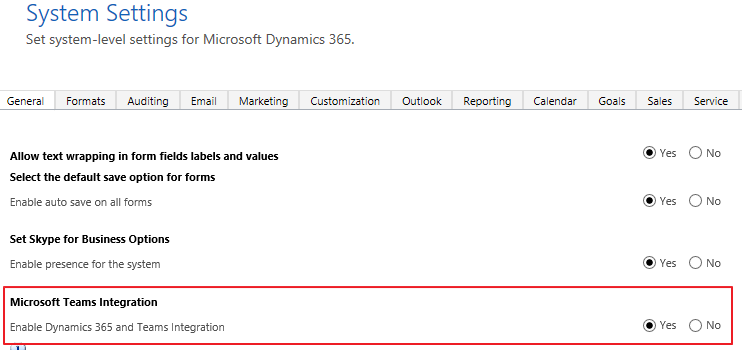
Start på opening the system settings from Dynamics and locating the “Enable Dynamics and Teams integration”.

NB! Before starting, I would create a new Team and a new channel just for the sake of simplicity. Also create a new record in CRM that you want to connect to.

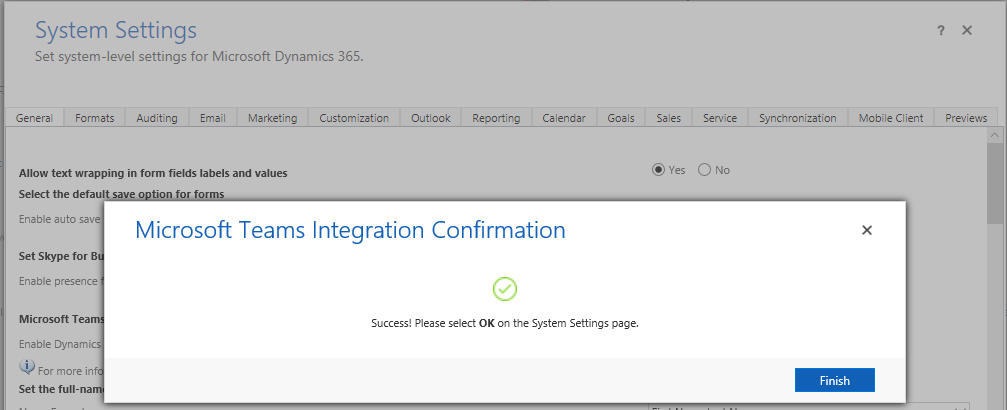
It took me about 3 minutes before I received my complete message, so be patient!

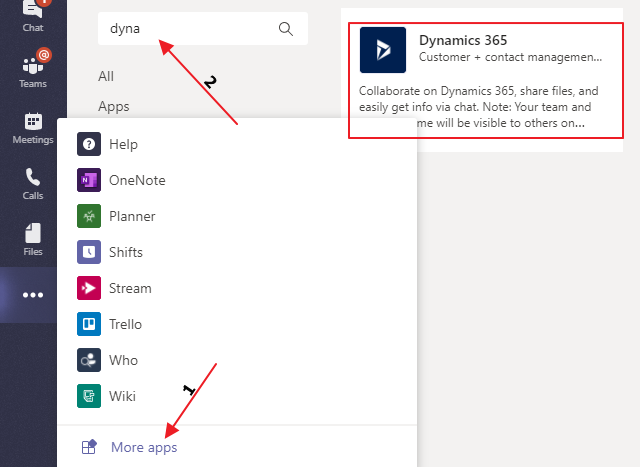
Open teams and locate the App Store within teams and search Dynamics. You will find it on the “…” menu on the left side.

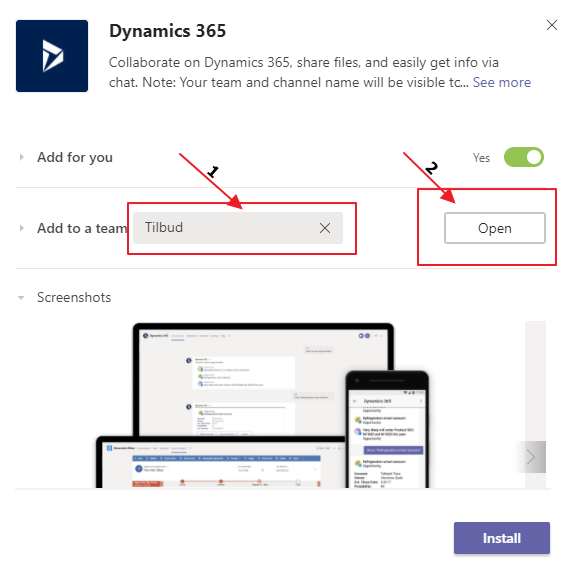
Add to the team you created. In my case “Tilbud” and then click Open

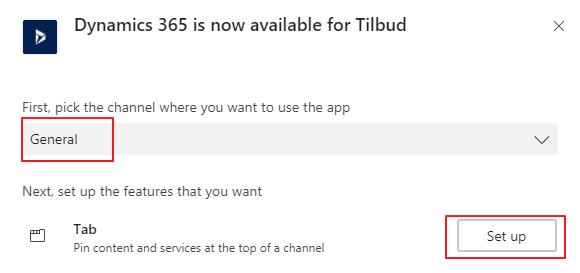
Next step is connecting it to the channel in the team, and hit “Set up”.

Now it will ask you for an entity to connect to, so I am going to choose the Opportunity I created before I started the configuration “Teams Opportunity”.

If it all went well, you will now see a new tab in your channel with the name of the record. You also see a message that the record is connected.

The result

Dynamics and Teams working together

Dynamics 365 UI navigation tip

Lets me start out by saying that the UI is WAY faster to navigate than the old interface. The load time for the records has increased by a lot and the views are snappy. I am not saying that it is ready to take over yet, but they are definitely doing some things right!

Anyway, I came across a great way to navigate a view the other day. This feature might have been there for a long time, but it was new to me.

Dynamics 365 simplified navigation UI

Starting from the view you can open a record. From here you can open the view you came from and simply navigate the records. Cool feature 🙂

Reference Panels = Love

During ignite 2018 Jukka introduced me to reference panels during a hands on lab. At the time I couldn’t for the love of god understand what the point was. It was being viewed in the “old” UI and it all looked really stupid.

Then all of the sudden Unified Interface made it all come together for me.

First start off by getting a hold of some icon’s (New icons for Dynamics 365 UI)
Contact
Opportunity
Case

To add icons to your solution check this blog

Start of by adding a reference panel to your Account form. A new section will be added.

The section looks completely normal, but it is different. I have chosen to move the section to the right part of the screen. Now when you add a subgrid to this section, you will see the difference!

Adding reference panel subgrid

Notice the difference here? “Tab Icon” is required. Locate the .svg file you downloaded for contact, and the rest is the same. Repeat the process for Opportunity and Case.

Save & Publish. Now open Unified Interface to view your form

Customizing forms Dynamics 365 UI

Again I have to state that we all have different preferences, and this is only my suggestion on how to make a simple demo. We all see the world different, and therefore no right or wrong answers here:)

Open http://www.powerapps.microsoft.com to edit your app

The whole point here is to add existing entities Account, Contact, Opportunity to the solution.

I prefer to only add what I will be working with. So I add the following views and forms for all entities

EntityAccountContact Oppty
FormMain +
QuickCreate +
QuickView
Main +
QuickCreate +
QuickView
Main +
QuickCreate +
QuickView
ViewOpen Account +
Ascociated view
Open Contat+
Ascociated view
Open Account +
My Opportunities +
Ascociated view +

You don’t really need the views, but I like them in case I want to do some editing, because I don’t have to create them from scratch. The QuickView form is because of the Reference Panels.

Your solution should look something like this now.

For the next step I configure the forms

NB!!! Before you edit the form, click “save as” and give it a name. I never configure the main forms because I want to keep them untouched for all future MS updates.

I also like to control the activity view, because the demo can be very “cluttery” if that is even a word.

Appointment, Email, Phone, Task
Remove as much as possible

For the next step, read the article about reference panels.

Repeat the form configuration for Contact and Opportunity. Remember to publish all changes.

Now open the app so we can see what it looks like

Remember to change the account form to view the SimpleSales account form.

This is how I prefer to configure the forms in CRM. We all have different ideas of the best way to do this. I configure with “less is more” approach.

Dynamics 365 UI Icon

Remember the 16×16 and 32×32 icons? Well, you don’t need them any more:) All you need to think about now are the .svg icons that adjust accordingly to what it should.

The issue at hand is one we all know and hate. The little puzzle image that indicates that you didn’t take the time to complete everything 100%. In my case I created a custom entity called Project.

https://www.flaticon.com <– Go here to get a hold of any icon you want. Free if you give credit to the author of the file. Remember that you have to download .svg file format.

Locate correct icon
Credit:)

Open your solution and add a new webresource of type .SVG. Remember save and publish!

Create Webresource
Save and publish

Unfortunately you now have to navigate to the Classic view, because this is currently not available in the PowerApps configuration yet.

Open the icon update, and select your new webresource Project Icon. Save and publish the entity.

Locate the correct .svg file

Open your UI app, and voila!! Everywhere will now have the correct icon because Dynamics 365 UI is automatically formatting this to the correct size 🙂

Uninstalling Dynamics 365 for Marketing dependency error

I installed Microsoft Marketing for the purpose of testing in our dev environment. My first irritation was the need of a separate portal just for marketing. I had to reset my customer self service portal just for marketing (fairly annoying). I have heard that this will change later this April, so hoping for the good news:)

PS! I also had to install VOC and I can’t really understand why I have to install this!

ANYWAY. If you wonder what the uninstall button does, here you go!

Email from Dynamics 365 marketing team

I started off opening the email I got when I installed the Dynamics 365 for Marketing and clicked the bottom link, and then “uninstall marketing from this org”.

Uninstall marketing from this org
Yes I’m sure
Work it!
Are you sure it is?

Well that is nice. It all took about 2 minutes. Could it be true that it was that easy?

NO (lol)

30 ish solutions and 1 portal reset later I was almost there!

Still there!
Reset portal
OMG!!
What could possibly go wrong?

Thank you VOC for creating dependencies that I simply can’t find.. Supportcase created.

Conclusion

This was far from smooth. Uninstalling the solutions way to long because Dynamics kept freezing (probably because of database locks).

Worst of all was probably that Voice Of Customer was installed and I can’t remove it without a support case.

Update:

Support called, and they found a dependency in the App for VOC that did not uninstall correctly. If you go into the default solution, and then remove the app step by step you can finally delete the VOC solution! For me that meant doing the ribbon first. Then the entities in the app, and finally the app. All the while publishing changes.